Wednesday 28 October 2009

Mini Fall Quilt Swap - thoughts.

At last the suspense is over!

I have the name of the recipient-to-be of my handiwork when it's done.

I have looked at her blog, and by golly do I have my work cut out!

Anyway, in the past few days, prior to my discovery this morning, I have been thinking about the mini-quilt.

I would like to learn something new during this process, so as a start I have challenged myself to come up with 10 ideas.

So far -
1. A seminole quilt using fall colours.
2. A trip to Ireland quilt using fall colours.
3. One fairly detailed tree.
4. Naive style trees in various colours.
5. Simplified trees in various colours - shapes really.
6. A Leaf.
7. A selection of Leaves.
8. A Squirrel with it's stash of acorns.
9. A basket of apples.
10. Any block I've always wanted to do using fall colours.

Now I need to dig out all suitable fabrics, and think over it all.

Holiday.

We had a lovely week in Croatia.

This is Dubrovnik Old Town. It was a very wet and windy day but we still walked around the walls.

Beware of Black cats

I go on holiday for a week, and the boy cat has slept on my new quilt for the entire time by the looks of it..


Now you can see why I am in no hurry to finish my hand sewn quilt with a cream background!

Wednesday 14 October 2009

Mini Fall Quilt Swap

Just to say since signing up for this I have looked at the blogs / flickr pages of some of the other participants and have scared myself.....

NEC Quilt Show 2009

A few of my favourites- sorry I can't credit the makers.


Thanks to Carol I can tell you this is called "Little Blue Line" by Mai-Britt Axelsen. It's her first major win in a quilt show. She has a lovely blog http://www.linen-and-silk.com/.

Seminole Quilt


I did this Quilt on a workshop at The Bramble Patch. It was a 2 day workshop - about 5 weeks apart. On the first day you made up 4 or 5 sections. In the weeks inbetween the workshops you made up a few more sections, returning with strips and all the rest of the fabric and the wadding to hang up on the wall to arrange all the strips on. It took ALL day to put up the pieced strips, cut other plain strips, and constantly rearrange them until you had a design you liked. Then you pinned the strips to the wadding so you could take it home.
At home I stitched the strips together into groups so that I had about 11 or 15 pieced sets each about 6 inches tall.
I tacked the wadding to the backing and tacked a straight line across the middle.
The method of assembling the Seminole Quilt is to take the 2 middle of the pieced sets, right sides together, and pin them onto the wadding, then stitch. Open up and iron. Take the next 2 strips, one to go towards the top, the other towards the bottom, and pin on the 2 already in place. Stitch. Open up and Iron. Continue working towards the 2 ends.

I enjoyed doing the Seminole Quilt. I think that some of the patterns could be repeated on their own. I also like the method of assembling the quilt and have done this method of sewing strips onto the sandwiched wadding and backing many times since - Pirate Quilt - Batik Quilt - Liams Christmas Quilt.

Scary Quilt

This is the same basic design as the first Christmas Quilt - just using Halloween or scary prints - aliens, spiders, skeletons, cobwebs, pumpkins and the like. I use black for the backing and appliqued on 5 white ghosts. I also added 5 long claw scratches bottom right hand corner - see the red flesh underneath?

Friday 9 October 2009

Trip to Ireland

On a trip to the Bramble Patch I bought a book "Trip to Ireland" by Elizabeth Hamby Carlson. This is very much the sort of book that appeals to me. She has combined 2 blocks - "Trip around the World" - and "Irish Chain" to produce "Trip to Ireland". I didn't follow a pattern exactly - I chose one called "Irish Trip" and amended it by making it the chains wider . I worked out how many blocks I wanted on the Quilt to give visual impact , then I calculated how big a finished square should be. I had to work out my own cutting instructions. The idea of this quilt was to utilise fabrics I already had so I had to calculate carefully! I used several Red and Burgundy prints to give texture and spread them around - this meant that I had to be careful when sewing up my strip sets so that I didn't place a fabric in the same place in each block. I wanted it to look rich and textured, not planned. I also used a yellow and an Ochre to add texture.

Elizabeth tells you how to make a mock up card showing the 2 blocks so you can see the pattern and help you with your fabric placement. Then you use it to see what strip sets to make.

There were, as usual, a few problems along the way. The tiny snippet of fabric I stuck on the card in one column looks like a different print - consequently I stitched the wrong print into one of the sets. I didn't notice until it was pieced. I had to unpick lots of blocks.

For some strange reason the Trip blocks went together OK but the Chain blocks all had a bulge in the middle. I had to unpick those and correct them too! I have since bought a quarter inch foot.

At this point I joined all the blocks to make a pieced top.


This sat in my cupboard for a while.

After I made Mum a quilt I asked my sister if she wanted this one. So I put the borders on it and quilted it. I made a plastic template so I could draw Baptist Fan on it which I machine stitched in a variegated thread.

I Spy Quilts

I did the first one of these in an Evening class I went to. the idea is for all prints to be different. It involves cutting lots small pieces from lots of novelty fabrics. I wanted to use just Animals/ Insect so I built up a stash of that type of print. The Basic Block is 9" Square. You need 1x 6" sq, 1x 3" sq and 6x rectangles 2" by 3". You need 24 of these blocks. So that's 24x 6" Sqs, 24x 3" sqs, and 144x 2" by 3" rectangles. Then there is a sashing 1.5" wide, then an pieced border made up of 3" sqs and 2" x 3" rectangles - approx 60 rectangles and 24 squares. All different, all cut to show the picture off, that's potentially a lot of wastage as you cut a small piece out of the centre of a piece of fabric. The finished Quilt is 45.5" by 63.5".

I then went on to make other 1-Spy quilts using less pieces per block, and leaving off the pieced border.
A baby quilt would be 16x 9" blocks, with a 3" plain border. Finished size 42" which miraculously is the width of fabric. Make the 9" block using 1 x 6" sq and 5 x 3" sqs. A longer quilt uses 24 of these blocks.
Then when you get fed up cutting lots of 3" blocks just do a combination of 9" sqs, 6" sqs, 4.5" sqs, . and 3" sqs, because at this point you just need to use up that stash, and move on!.


Feathered Star


I asked my Mum on her 75th Birthday if she would like a Quilt. She gave me a piece of her curtain fabric to match the colours. I have always loved Feathered Stars. I've drooled over Marsha McCloskeys intricate stars, but I know they are too elaborate for a first attempt.
I saw a pattern in a magazine with just 1 big feathered star in the centre. It was from Patchwork and Quilting, the article was by Jackie Taylor from White Cottage Crafts.


Yes, I could do that. But I hate following patterns, I want to create my own quilts so I took the star as the centre, put it on point and played around with a few designs for the border. I decided to quilt it in 5 sections. I'd do the central square and the 4 corners, then piece them together. I had to work out where I was going to put the joins according to where I wanted to quilt.

The centre of my quilt is quilted with a celtic ring. I drew the pattern to fit then cut a card template.


The leaf design is from a pack of quilting designs, the heart is actually a leaf design from the same pack. I scaled up the design to fit the spaces. I used a light box and marked the leaf and heart leaf designs prior to sandwiching.


The wandering line with the spiral along the border is over the join so had to be done last. I marked it with a plastic stencil I had cut.


The 4 corners are quilted in the ditch (furrow!) by machine.


It took quite a bit of washing with lux flakes to remove the pencil marks. I hung it to dry on the radiator. The next morning it was nice and dry, but it had somehow picked up a spec of magenta pink dye powder from somewhere ( hmm, wonder where that came from....?) and there were a couple of Pink dyed patches. Well I went to work, couldn't do much all day!! Looked at it when I got home. Fortunately for me it was on a couple of strips in one of the corners where there was not any quilting ( other than in the ditch), and I had a bit of each of those fabrics left. I had to cut out the strips and replace. Once it was washed I hung it somewhere else - and when it was dry I gave it to my Mum.


"Oh, keep it and give it me for Christmas" she said.


"No", I said, "it's your responsibility now"!

Log Cabin


Whilst researching quilting patterns for my Mum's Quilt I bought a book called Welsh Quilts by Jen Jones. There is a picture in there of a log cabin quilt - bottom left hand corner.


The Quilt is 14 by 16 blocks, I don't know how big the quilt is, and having got my magnifying glass out I counted the strips per block - 10 ? around the central square- that would make the strips teeny tiny 1/2 ? inch wide.

It's a beautiful quilt but would take a long time.


I decided it needed 5 rows per block as in the original to give the interest of the light and dark strips. I cut the strips 1 &1/4" wide to give a 8 &1/4" block. The quilt measures 82 &1/2 " square. I didn't have to buy many fabrics to do this quilt - I had a stash of cream, beige, brown and red already. I just had to buy the Blacks.

This is the second Quilt that I quilted in panels. I did 3 panels - a central 4 by 10, and the 2 sides 3 x 10 blocks. I sandwiched the 3 panels and quilted what I could.
I quilted 5 lines of stitching across the middle of each coloured square. - this is my sketch from when I was playing with Quilting ideas.


Then I joined the panels and quilted over the joins.

Slip stitching the binding on the back was hard work on the eyes as it is a black print.

I love it for the texture in the blocks, the variety of prints really make it.

Thursday 8 October 2009

Batik

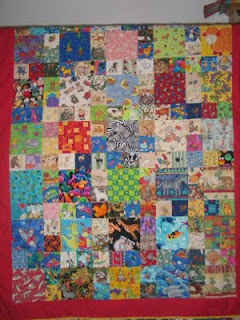
This was the first Jelly roll Quilt I did.


Bought from Crafts and Quilts at the Heart of the Shires - it was so bright I just couldn't resist.


I got out my box of Plain fabrics and pulled out all the brights. I asked my 11 year old if he wanted a new quilt, and between the 2 of us we designed it.


He excluded a few of the strips that were more Pink, then we cut the rest into 10 1/2 inch strips. We worked out that we should put on average 3 strips in each block, and Joseph decided which Batiks went with each Plain fabric, and the positioning of the strips. We varied the widths and positions of the plain strips.


I must tell you something he said, that makes me soooooo proud.
"It's a shame we have to cut them up" he said.

"What would you do with them" I asked.

"Just look at them" he said, stroking one. Brilliant - a child who loves fabric!!!!


I wanted him to sew it as well but he wasn't keen. I just had my old Frister Rossman machine at the time and it goes too fast for him. I am now the proud owner of a Janome QC4900 and he has done a bit on that.


We arranged the blocks on his floor.


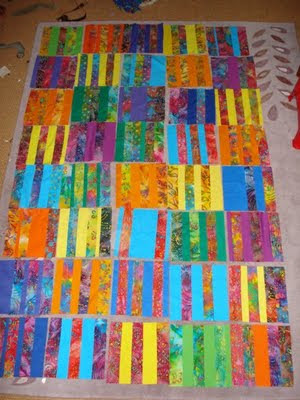
The finished Quilt is 50 by 80 inches. I hate sandwiching large quilts so I did it in 2 halves, top and bottom. I love Quilting in sections, it makes it so much more manageable.

I tacked the wadding to the backing ( a bright green batik) . I joined the blocks into rows, and stitched the rows of 5 squares to the sandwich. This meant that once I had joined the 2 halves together all I needed to do was quilt down, firstly in the ditch ( furrow!) between the squares, then down another ditch , moving across to another seam as needed.

The Pink strips that were put aside have found their way into a bag - but it's very much work in progress - I'm trying to do a structured bag, it's the first I've ever done and I've hit a brick wall.

WIP's - UFO's - Unmentionables

Yes I have a few.

At the moment I have a fair number.

1. Snails Trail. Sandwiched. Took on a machine quilting workshop years ago, needs finishing.

2. Blues Gems. Seemed like a good idea at the time. I had a book "Start with Squares" by Martha Thompson. One of her techniques makes "Triangle Gems" from 4 squares of fabric. This is a technique that appeals to me but in reality it was hard work as I had lots of trimming to do. I arranged my Gems into a square with colour graduation from one point to the opposite. My 11 year old wants me to finish it as he likes it.

3. School Houses. I have some, I have more in pieces, and more uncut fabric. Fiddly. May just use what I've done so far as I never had a finished article in mind.

4. 1930's Print Blocks. 42 blocks done. Was going to be a single bed quilt. Will now use them to do baby quilts.

5. A cushion panel from a workshop with Ineke Berlin. One day.

6. Carpenters Star. Very much WIP. Awaiting my reading glasses then I will continue it. It is hand sewing paper pieces. I am using left over prints from my mothers and my sisters quilts.

Ahoy me hearties!!!


Pirates are sailing the English coutryside.
Quite what I'll do with my Purple floral prints I don't know, I have 2 boys. Boys want Scary Halloween and Pirate Quilts.

This was a simple one I did for my 6 year old. I bought 5 Fat Quaters - the 2 Pirate Prints and the Map Print for the Squares and the Netting and Cross Bones for the borders. Then I bought a bit more of the Map print for the outer border and had to top up on Black as well. Consequently I have 2 shades of black in the sashing but they are very close, and Liam won't notice.

Beautiful Heather Bailey fabrics


These lovely fabrics are various Heather Bailey fabrics I bought from the Quilt Room as a Jelly roll. I did a workshop with Amanda from Monkey Buttons - we did her Jelly Jazz Quilt.
I added a few plain pinks, as I hoped to make it a little larger.


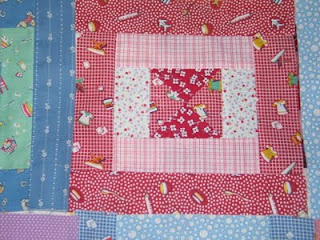
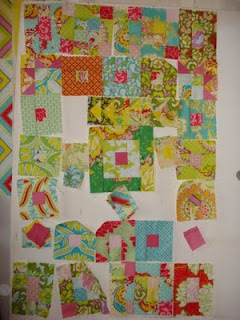
The Quilt is made up of a few different blocks.
I bought some plain green for the sashing, and the Swirly Buds in Lime Green Heather Bailey fabric for the backing. (from Gone to Earth ).I just did basic Quilting in the ditch (furrow!).

It's for the spare bed, now I need to buy a new plain but bright duvet case to show it off.